Disclaimer: This material is provided for educational purposes only. Using a VPN should not violate the laws of your country or the rules of your service providers.
A VPN (Virtual Private Network) is a technology that allows you to create a secure connection between your device and a remote server via the Internet. Essentially, in this case, traffic passes through an encrypted tunnel, making it impossible to intercept or analyze at intermediate network nodes. In infrastructure practice, VPNs are used not only to hide IP addresses, but also to organize remote access to servers, connect to internal company services, and ensure secure administration and network segmentation.
In this article, we will examine how VPNs work at the architectural level, which protocols are relevant today and how they differ from each other, how to configure a connection in Linux and Windows, and how to deploy your own VPN server based on a simple VPS. We will also look at methods for checking the correctness of the connection and typical errors that are most often encountered during configuration. This article is aimed at a technical audience - system administrators, DevOps engineers, and Linux users who need to understand not only the basics of VPNs but also delve a little deeper into the subject.
How VPNs work: client and server
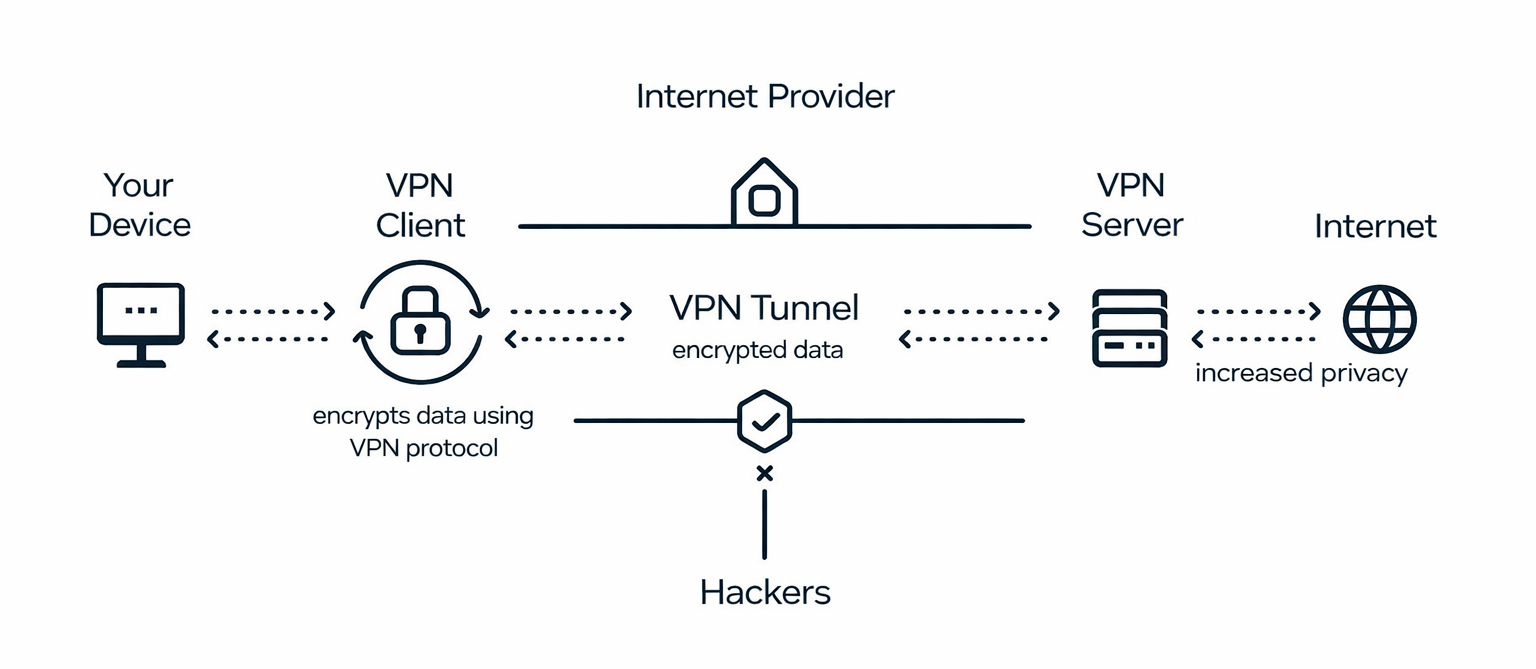
Any VPN scheme is built around two components: the server and the client. The VPN server is deployed on a remote machine, most often a VPS or a dedicated server in a data center. The VPN client is installed on the user's device, such as a workstation, laptop, or even another server that needs to connect to the secure network.
When a connection is established, an encrypted tunnel is created between the client and the server. A virtual network interface (e.g., tun0 or wg0) appears at the operating system level, through which traffic begins to be routed. Depending on the configuration, the default route changes, and all outgoing traffic is sent not directly to the Internet, but through the VPN server. Address translation (NAT) is performed on the server side, so external resources see the server's IP address rather than the client's real address.
To simplify the architecture, the diagram shows that your computer establishes a secure connection to the VPN server, and the server accesses the Internet on its own behalf. This is why VPNs are often used to isolate administrative access, set up secure channels between offices, or provide secure remote access to internal services.
It is essential to distinguish between connecting to a public VPN provider and deploying your own VPN server. In the first case, you are using someone else's infrastructure and trusting the service operator.
In the second case, you rent or use your own server and have complete control over the configuration, logs, and access rules. For technical tasks related to server administration, access to closed services, or building your own network architecture, independent VPN deployment is usually a more secure and predictable solution.
When does it make sense to set up your own VPN?
Deploying your own VPN server is justified in cases where you need to not only change your IP address, but also build a controllable and predictable network architecture. This is primarily relevant for remote server administration. For example, instead of opening SSH or control panels on the Internet, you can restrict access only through a VPN tunnel, significantly reducing the attack surface.
A private VPN is also used to organize access to internal services of companies and institutions - databases, private APIs, monitoring panels, or Kubernetes clusters that should not be publicly available. This approach allows you to keep your infrastructure hidden and provide access only to authorized users.
In addition, VPNs are useful for securely connecting to your home or office network from anywhere in the world. This is especially relevant for distributed teams and DevOps engineers who need constant access to test or production environments. A separate scenario is testing applications with different geolocations or checking the behavior of services when connecting from other countries.
Finally, a private VPN is often used to segment access within the infrastructure, for example, when some services should only be accessible from the internal network or through a separate administrative circuit. In such cases, a VPN becomes not a tool for anonymity, but a full-fledged element of network security.
Choosing a protocol: OpenVPN, SoftEther, or WireGuard
When deploying a VPN, one of the key decisions is choosing a protocol. Today, OpenVPN, SoftEther, and WireGuard are most commonly used in infrastructure practice. Each of them solves the same problem, but they differ in architecture, performance, and configuration complexity.
OpenVPN has long been the industry standard. It is well documented, supported by virtually all operating systems and network equipment, flexibly configurable, and allows for complex authentication scenarios. However, its performance largely depends on the configuration and encryption used, and the configuration itself can be quite extensive.
SoftEther is a more versatile and functional solution capable of working with multiple protocols simultaneously (including L2TP/IPsec and SSL-VPN). It is suitable for complex corporate scenarios, but its configuration and maintenance require more attention and experience.
WireGuard is a modern protocol with a minimalist architecture and compact code base. It uses modern cryptographic algorithms, demonstrates high performance, and is much easier to configure than OpenVPN. Due to its lightness and efficiency, WireGuard is often chosen for VPN deployment on VPS, in cloud environments, and in DevOps infrastructure.
Table - Comparison of OpenVPN, SoftEther, and WireGuard
| Criterion |
OpenVPN |
SoftEther |
WireGuard |
| Architecture |
SSL/TLS based on OpenSSL |
Multi-protocol platform (SSL-VPN, L2TP/IPsec, SSTP, etc.) |
Minimalistic UDP-based protocol |
| Transport Protocol |
UDP or TCP |
TCP, UDP, HTTPS |
UDP only |
| Cryptography |
Highly configurable (TLS, certificates, PKI) |
SSL/TLS, IPsec and other mechanisms |
Modern algorithms (Curve25519, ChaCha20, Poly1305) |
| Performance |
Moderate, depends on configuration |
Moderate |
High, minimal overhead |
| CPU Usage |
Moderate |
Moderate |
Low |
| Ease of Configuration |
Moderate (many parameters) |
Complex (feature-rich) |
Simple, compact configuration |
| Mobile Device Support |
Yes |
Yes |
Yes |
| Router Support |
Wide support |
Limited |
Increasing adoption |
| Scalability |
Good |
High |
Excellent for cloud/VPS |
| Suitable for Site-to-Site |
Yes |
Yes |
Yes |
| Suitable for VPS |
Yes |
Yes |
Yes |
| Solution Maturity |
Over 20 years |
Over 10 years |
Actively developed since 2018 |
| Typical Use Cases |
Corporate VPNs, broad compatibility |
Enterprise networks with multiple protocol support |
VPS, DevOps, cloud environments, high performance |
To sum up: OpenVPN remains a universal and highly compatible solution, especially in corporate environments with established infrastructure. SoftEther is suitable for complex network scenarios that require support for multiple protocols simultaneously. WireGuard is the most modern and productive option, which is now most often chosen for deploying VPNs on VPS, in the cloud, and in DevOps infrastructure due to its speed, simplicity, and compact architecture.
Now that we've covered the theory, it's time to move on to practice. And in order not to overload the material with a multitude of different implementations, all client examples below will be based on OpenVPN, as it is one of the most common and compatible protocols.
Configuring the server side (OpenVPN, Linux)
The server side of a VPN is almost always deployed on Linux - most often either a VPS or a dedicated server in a data center. In this section, we will look at the basic installation of OpenVPN on Ubuntu/Debian. It is assumed that you already have a server with a public IP address and SSH access.
System preparation
Update the packages:
sudo apt update && sudo apt upgrade -y
Install OpenVPN and tools for working with certificates:
sudo apt install openvpn easy-rsa -y
PKI configuration and certificate generation
OpenVPN uses a public key infrastructure (PKI). Using easy-rsa, the following are created:
- a certificate authority (CA),
- a server certificate,
- client certificates,
- and Diffie-Hellman parameters.
Initialization example:
make-cadir ~/openvpn-ca cd ~/openvpn-ca
Next, configure the varsfile, create a CA, and generate keys. In production scenarios, it is recommended to automate the process and store private keys outside the public directory.
Basic server configuration
The configuration file is usually located in:
/etc/openvpn/server.conf
Minimum working example:
port 1194
proto udp
dev tun
ca ca.crt
cert server.crt
key server.key
dh dh.pem
server 10.8.0.0 255.255.255.0
persist-key
persist-tun
keepalive 10 120
cipher AES-256-GCM
user nobody
group nogroup
Enabling IP forwarding
To enable the server to route traffic:
sudo nano /etc/sysctl.conf
Add or uncomment:
net.ipv4.ip_forward=1
Apply changes:
sudo sysctl -p
Configuring NAT
To allow clients to access the Internet, you need to enable NAT:
sudo iptables -t nat -A POSTROUTING -s 10.8.0.0/24 -o eth0 -j MASQUERADE
(replace the eth0 interface with your network interface)
Opening a port in the firewall
If using UFW:
sudo ufw allow 1194/udp
Starting the server
sudo systemctl enable openvpn-server@server sudo systemctl start openvpn-server@server
Creating a client configuration file (.ovpn)
After generating certificates and keys on the server, you need to prepare a single configuration file for the client. It is usually named, for example, client1.ovpn. This file contains connection parameters and built-in certificates so that the user does not have to transfer several separate files.
Basic client configuration template
Create the file:
sudo nano /etc/openvpn/client1.ovpn
Example of minimum content:
client
dev tun
proto udp
remote <SERVER_IP> 1194
resolv-retry infinite
nobind
persist-key
persist-tun
remote-cert-tls server
cipher AES-256-GCM
auth SHA256
verb 3
Replace <SERVER_IP> with the public IP address of your VPS or domain name.
Embedding certificates in the file
To make the configuration standalone, certificates and keys are usually embedded in it.
The following blocks are added to the end of the file:
<ca>
-----BEGIN CERTIFICATE-----
(contents of ca.crt)
-----END CERTIFICATE-----
</ca>
<cert>
-----BEGIN CERTIFICATE-----
(contents of client1.crt)
-----END CERTIFICATE-----
</cert>
<key>
-----BEGIN PRIVATE KEY-----
(contents of client1.key)
-----END PRIVATE KEY-----
</key>
The contents of the files can be obtained with the command:
cat /path/to/ca.crt
cat /path/to/client1.crt
cat /path/to/client1.key
Copy them strictly between the corresponding tags.
If you plan to use login/password authentication, then add the following line to the configuration:
auth-user-pass
In this case, the client will be prompted to enter their credentials when connecting.
After startup, the server is ready to accept connections.
Configuring the client side on Linux
The client side is also most often installed on Linux, so we will start with that. This can be an administrator's workstation or another server.
Installing the client
sudo apt update sudo apt install openvpn -y
Obtaining the configuration file
As we mentioned above in the relevant section, a file named .ovpnis generated on the server for the client, containing:
- the server address,
- port,
- certificates,
- and encryption parameters.
The file is transferred to the client machine, for example to:
/etc/openvpn/client.ovpn
Connect
sudo openvpn --config /etc/openvpn/client.ovpn
If the connection is successful, the following message will appear:
Initialization Sequence Completed
Checking the connection
Checking the external IP:
curl ifconfig.me
Checking the routes:
ip route
The tun0 interface will appear, through which traffic will pass.
Configuring the client side on Windows
To connect from Windows, use OpenVPN GUI.
Installation
- Download the OpenVPN installer.
- Install the program.
- Run OpenVPN GUI as an administrator.
Adding a configuration
Copy the .ovpn file to the directory:
C:\Program Files\OpenVPN\config\
Connecting to the server
- Click on the OpenVPN icon in the system tray.
- Select a profile.
- Click Connect.
- Enter your login and password, if required.
Once the connection is successful, the icon will turn green.
Common errors when setting up a VPN
When working with OpenVPN, most problems can be diagnosed using the client or server logs. Below are the most common errors and their typical causes.
TLS handshake failed
One of the most common errors that occurs during the connection establishment phase. It means that the client cannot complete the TLS handshake with the server.
Possible causes:
- incorrect IP address or port specified in the
remoteparameter;
- the server is not running or is listening on a different port;
- the port is blocked by a firewall (on the server or on the provider's side);
- certificate mismatch or use of a certificate not signed by your CA;
- time desynchronization on the server and client.
First of all, you should check whether the server is available on the required port and whether the OpenVPN service is running.
Authentication failed
An authentication error occurs after the connection is established if the server rejects the client's credentials.
The main reasons are:
- incorrect login or password;
- the
auth-user-passstring is missing from the client configuration;
- the server is configured to check certificates, and the client is trying to connect using only a login and password;
- the client's certificate has expired or been revoked.
To diagnose the problem, check the server log, which will indicate the specific reason for the failure.
Cannot assign requested address
This error is usually related to network configuration issues.
The most common causes are:
- a route conflict in the routing table;
- incorrectly configured address pool on the server;
- absence or damage to the virtual interface
tun;
- IP forwarding disabled on the server.
In such cases, it is worth checking the presence of the interface (ip a), the routing table (ip route), and the server parameters.
Low connection speed
If the VPN is working but the speed is significantly lower than expected, the following reasons are possible:
- TCP is used instead of UDP (TCP over TCP can cause performance degradation);
- incorrectly selected MTU, which leads to packet fragmentation;
- insufficient VPS resources (CPU or bandwidth);
- high latency to the server due to geographical distance.
For optimization, it is recommended to use UDP, select the correct MTU value, and ensure that the server has sufficient resources to handle traffic encryption.
VPN server security
Deploying a VPN is only the first step. It is equally important to properly secure the server itself, as it becomes the entry point to your infrastructure. An incorrectly configured VPN server can create more risks than an open port.
First and foremost, it is recommended to disable password authentication for SSH and use only key-based login. This significantly reduces the likelihood of successful credential brute-forcing. In the file /etc/ssh/sshd_config, disable PasswordAuthentication and restart the SSH service.
Access to the server and the VPN port itself should be restricted by a firewall. Do not leave unnecessary services open - allow only the necessary ports (for example, 22 for SSH and 1194/udp for OpenVPN) and close everything else by default.
It is also recommended to set up a brute force protection system, such as fail2ban. It monitors suspicious activity in the logs and temporarily blocks IP addresses from which password guessing attempts or incorrect connections are coming.
The server must be updated regularly. Vulnerabilities in OpenSSL, the Linux kernel, or OpenVPN itself can be exploited for attacks if the system is not kept up to date.
Special attention should be paid to the storage of private keys and certificates. They should not be located in public directories, transmitted over unprotected channels, or stored without a backup. Ideally, private keys of the certification authority (CA) should not be stored on the production server at all after client certificates have been generated.
In an infrastructure context, a VPN server is an element of the security perimeter. Therefore, its protection should be comparable to that of a public web server or administrative panel, or perhaps even higher.
Conclusions
A VPN is not a tool for anonymity, but a full-fledged mechanism for building a secure network architecture. In this article, we have covered the entire cycle of tasks, from deploying the server part on Linux to connecting clients with Linux and Windows, as well as touching on issues of diagnostics and security.
The server side is almost always deployed on Linux, as it is easier to manage routing, firewalls, NAT, and certificates there. The client side can run on different platforms, but Linux is most often used in technical environments, both on administrator workstations and on intermediate servers within the infrastructure. Windows clients remain a convenient option for work machines and mixed environments.
We have discussed how the client configuration file is generated, how to properly organize PKI, and how to check the correctness of routing and external IP after connection. We paid special attention to typical errors and ways to diagnose them, which significantly reduces the time spent searching for problems during the first launch.
It is important to understand that a VPN server becomes part of the security perimeter. It must be protected as strictly as any public service, for example, by restricting access, using key authentication, regularly updating the system, and monitoring logs.
And if your goal is to build a manageable, secure, and predictable infrastructure, then your own VPN is a fairly rational solution. It allows you to isolate administrative access, hide internal services from the public network, and centrally manage connections. In this approach, VPN ceases to be a supporting tool and becomes an important element of network security and DevOps architecture.